
Assembly Instructions
Parts

Step 1
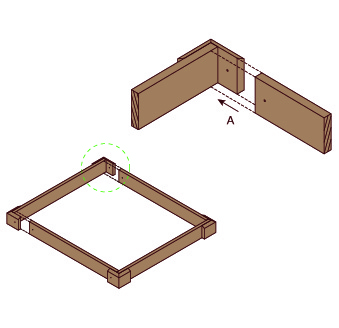
Unwrap the first set of corners and set them with beveled side up and the flat surface set flush on level ground. The beveled top of the corner will appear like a shed roof with the top angled down. Place the two prefabricated corners across from each other with the length of your bed spaced in between.
Next, unwrap the set of Length boards and set on the inside of the corners (fig. A). This will create a square or rectangular shape.

Step 2
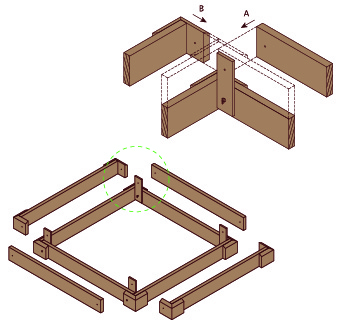
Place one of the four Stackers vertically on the inside walls of your bed, close to the corner and flush with the Length boards. Repeat at each corner.
Find the four bolts and wing nuts that have been provided with each corner set. Starting from the outside (fig. A), slide the bolt through the pre-drilled corner hole, through the hole in the Length board (fig. B) and finally through the Stacker (fig. C). Repeat at each corner.
Lightly turn the wing nut so it is loosely held together--do not tighten all the way.
Step 3
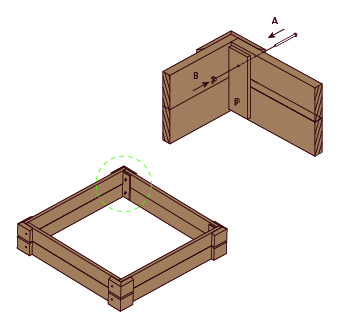
Repeat Step 1, arranging the pieces on top of your loosely assembled base. The Length pieces should be flush with the Stacker (fig. A), leaving the corner (fig. B) to wrap around the outside. Check that the beveled edge of the corner pieces are all facing upwards.
Step 4
Repeat Step 2 making sure to pass the bolt first through the outside of the corner piece (fig. A), followed by the Length board and ending with the Stacker. Loosley tighten the wing nut onto the bolt (fig. B).
Once all is lightly assembled, check that all of the beveled corners are face up and that the boards are square and come to a 90 degree angle at the corners.
You can now tighten down all the wingnuts. This is when the bed is easiest to pick up and move. Be sure the bed is level prior to installing soil.
Helpful Hints
Assembling the bed on level ground will help with aligning the drill holes.
Clear away any wood shavings that may block the bolt from passing through the holes.
Wiggle the Stacker if you are having trouble getting the bolt through all 3 pieces.